Some server providers, such as Amazon EC2 and Google Compute Engine, disable SSH password authentication by default. That is, you can only log in overSSHusing public key authentication.
SFTP is a protocol that runs over SSH, so this means SFTP using passwords will not work by default when SSH password authentication is disabled.
To enable SSH password authentication, you must SSH in as root to edit this file:
/etc/ssh/sshd_config
$ sudo vi /etc/ssh/sshd_config
Then, change the line
PasswordAuthentication no
to
PasswordAuthentication yes
Then Save
After making that change, restart the SSH service by running the following command as root:
sudo service ssh restart
Enable Logging In as root(Optional)
Some providers also disable the ability to SSH in directly as root. In those cases, they created a different user for you that has sudo privileges (often named ubuntu). With that user, you can get a root shell by running the command:
sudo -i
If you instead want to be able to directly SSH in as root, again edit this file:
/etc/ssh/sshd_config
And change the line
PermitRootLogin no
to
PermitRootLogin yes
After making that change, restart the SSH service by running the following command as root:
sudo service ssh restart
If you enable this setting, don't forget to set a strong password for root by running the command.
Kubernetes is a portable, extensible, open-source platform for managing containerized workloads and services, that facilitates both declarative configuration and automation. It has a large, rapidly growing ecosystem. Kubernetes services, support, and tools are widely available. The name Kubernetes originates from Greek, meaning helmsman or pilot. Google open-sourced the Kubernetes project in 2014. Kubernetes combinesover 15 years of Google's experiencerunning production workloads at scale with best-of-breed ideas and practices from the community
Going back in time
Let's take a look at why Kubernetes is so useful by going back in time.
Traditional deployment era: Early on, organizations ran applications on physical servers. There was no way to define resource boundaries for applications in a physical server, and this caused resource allocation issues. For example, if multiple applications run on a physical server, there can be instances where one application would take up most of the resources, and as a result, the other applications would underperform. A solution for this would be to run each application on a different physical server. But this did not scale as resources were underutilized, and it was expensive for organizations to maintain many physical servers.
Virtualized deployment era:As a solution, virtualization was introduced. It allows you to run multiple Virtual Machines (VMs) on a single physical server's CPU. Virtualization allows applications to be isolated between VMs and provides a level of security as the information of one application cannot be freely accessed by another application.
Virtualization allows better utilization of resources in a physical server and allows better scalability because an application can be added or updated easily, reduces hardware costs, and much more. With virtualization you can present a set of physical resources as a cluster of disposable virtual machines.
Each VM is a full machine running all the components, including its own operating system, on top of the virtualized hardware.
Container deployment era: Containers are similar to VMs, but they have relaxed isolation properties to share the Operating System (OS) among the applications. Therefore, containers are considered lightweight. Similar to a VM, a container has its own filesystem, share of CPU, memory, process space, and more. As they are decoupled from the underlying infrastructure, they are portable across clouds and OS distributions.
Containers have become popular because they provide extra benefits, such as:
Agile application creation and deployment: increased ease and efficiency of container image creation compared to VM image use.
Continuous development, integration, and deployment: provides for reliable and frequent container image build and deployment with quick and easy rollbacks (due to image immutability).
Dev and Ops separation of concerns: create application container images at build/release time rather than deployment time, thereby decoupling applications from infrastructure.
Observability not only surfaces OS-level information and metrics, but also application health and other signals.
Environmental consistency across development, testing, and production: Runs the same on a laptop as it does in the cloud.
Cloud and OS distribution portability: Runs on Ubuntu, RHEL, CoreOS, on-premises, on major public clouds, and anywhere else.
Application-centric management: Raises the level of abstraction from running an OS on virtual hardware to running an application on an OS using logical resources.
Loosely coupled, distributed, elastic, liberated micro-services: applications are broken into smaller, independent pieces and can be deployed and managed dynamically – not a monolithic stack running on one big single-purpose machine.
Containers are a good way to bundle and run your applications. In a production environment, you need to manage the containers that run the applications and ensure that there is no downtime. For example, if a container goes down, another container needs to start. Wouldn't it be easier if this behavior was handled by a system?
That's how Kubernetes comes to the rescue! Kubernetes provides you with a framework to run distributed systems resiliently. It takes care of scaling and failover for your application, provides deployment patterns, and more. For example, Kubernetes can easily manage a canary deployment for your system.
Kubernetes provides you with:
Service discovery and load balancing Kubernetes can expose a container using the DNS name or using their own IP address. If traffic to a container is high, Kubernetes is able to load balance and distribute the network traffic so that the deployment is stable.
Storage orchestration Kubernetes allows you to automatically mount a storage system of your choice, such as local storages, public cloud providers, and more.
Automated rollouts and rollbacks You can describe the desired state for your deployed containers using Kubernetes, and it can change the actual state to the desired state at a controlled rate. For example, you can automate Kubernetes to create new containers for your deployment, remove existing containers and adopt all their resources to the new container.
Automatic bin packing You provide Kubernetes with a cluster of nodes that it can use to run containerized tasks. You tell Kubernetes how much CPU and memory (RAM) each container needs. Kubernetes can fit containers onto your nodes to make the best use of your resources.
Self-healing Kubernetes restarts containers that fail, replaces containers, kills containers that don't respond to your user-defined health check, and doesn't advertise them to clients until they are ready to serve.
Secret and configuration management Kubernetes lets you store and manage sensitive information, such as passwords, OAuth tokens, and SSH keys. You can deploy and update secrets and application configuration without rebuilding your container images, and without exposing secrets in your stack configuration.
The architecture of kubernetes(Master/Worker Node)
What happens in the Kubernetes control plane?
Control plane
Let’s begin in the nerve center of our Kubernetes cluster: The control plane. Here we find the Kubernetes components that control the cluster, along with data about the cluster’s state and configuration. These core Kubernetes components handle the important work of making sure your containers are running in sufficient numbers and with the necessary resources.
The control plane is in constant contact with your compute machines. You’ve configured your cluster to run a certain way. The control plane makes sure it does.
kube-apiserver
Need to interact with your Kubernetes cluster? Talk to the API. The Kubernetes API is the front end of the Kubernetes control plane, handling internal and external requests. The API server determines if a request is valid and, if it is, processes it. You can access the API through REST calls, through the kubectl command-line interface, or through other command-line tools such as kubeadm.
kube-scheduler
Is your cluster healthy? If new containers are needed, where will they fit? These are the concerns of the Kubernetes scheduler.
The scheduler considers the resource needs of a pod, such as CPU or memory, along with the health of the cluster. Then it schedules the pod to an appropriate compute node.
kube-controller-manager
Controllers take care of actually running the cluster, and the Kubernetes controller-manager contains several controller functions in one. One controller consults the scheduler and makes sure the correct number of pods is running. If a pod goes down, another controller notices and responds. A controller connects services to pods, so requests go to the right endpoints. And there are controllers for creating accounts and API access tokens.
etcd
Configuration data and information about the state of the cluster lives in etcd, a key-value store database. Fault-tolerant and distributed, etcd is designed to be the ultimate source of truth about your cluster.
What happens in a Kubernetes node?
Nodes
A Kubernetes cluster needs at least one compute node, but will normally have many. Pods are scheduled and orchestrated to run on nodes. Need to scale up the capacity of your cluster? Add more nodes.
Pods
A pod is the smallest and simplest unit in the Kubernetes object model. It represents a single instance of an application. Each pod is made up of a container or a series of tightly coupled containers, along with options that govern how the containers are run. Pods can be connected to persistent storage in order to run stateful applications.
Container runtime engine
To run the containers, each compute node has a container runtime engine. Docker is one example, but Kubernetes supports other Open Container Initiative-compliant runtimes as well, such as rkt and CRI-O.
kubelet
Each compute node contains a kubelet, a tiny application that communicates with the control plane. The kublet makes sure containers are running in a pod. When the control plane needs something to happen in a node, the kubelet executes the action.
kube-proxy
Each compute node also contains kube-proxy, a network proxy for facilitating Kubernetes networking services. The kube-proxy handles network communications inside or outside of your cluster—relying either on your operating system’s packet filtering layer, or forwarding the traffic itself.
How to set up EKS(Elastic Kubernetes Services) on Amazon Services
command to follow
Pre-requistes:
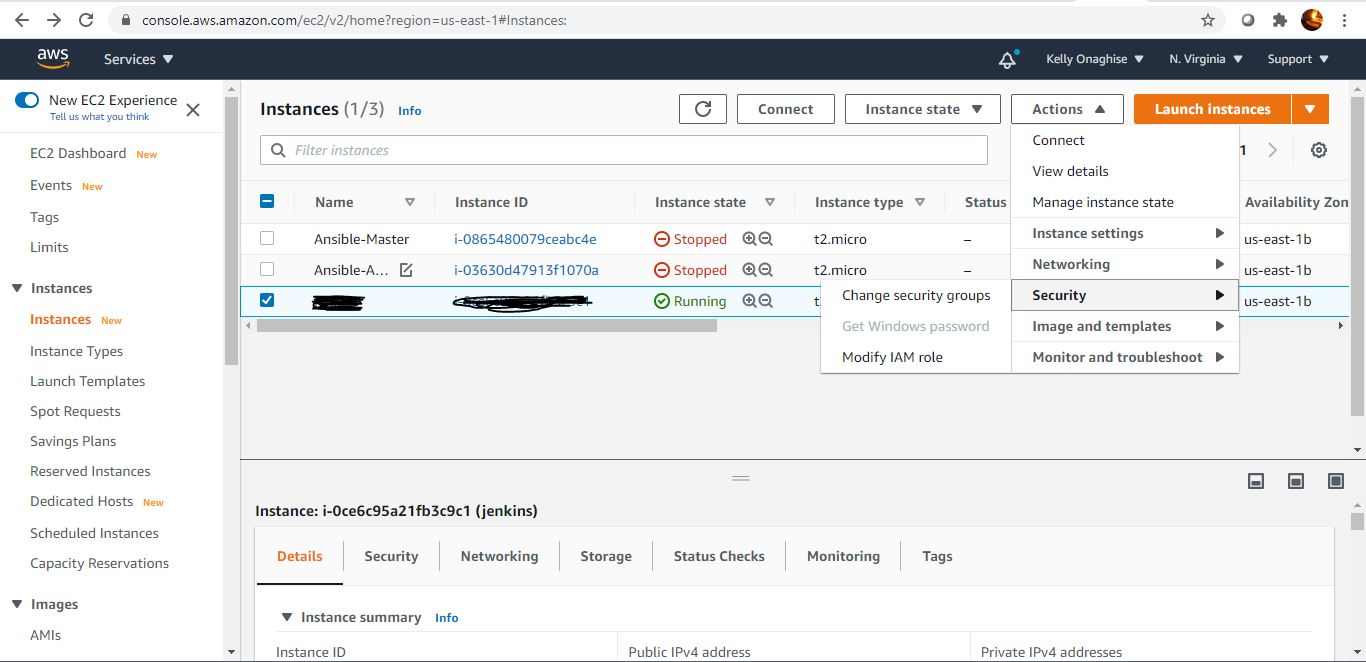
Create EC2 with Amazon Linux 2 AMI with Executable permission under Security Credentials ---->Role by giving a unique name
And Attach the role your created from above to the EC2
Click on action-->Security---->Modify IAM role and select the role you created ealier
Command to Install Amazon EKS
pip:curl -O https://bootstrap.pypa.io/get-pip.py
yum install python3-pip
ls -a ~
export PATH=~/.local/bin:$PATH
source ~/.bash_profile
pip3
AWS CLI
pip3 install awscli --upgrade --user
aws --version
aws configure
eksctl
curl --silent --location "https://github.com/weaveworks/eksctl/releases/download/latest_release/eksctl_$(uname -s)_amd64.tar.gz" | tar xz -C /tmp
sudo mv /tmp/eksctl /usr/local/bin
eksctl version
If you get something like "no command found" enter the below command
Blue/green deployment is a continuous deployment process that reduces downtime and risk by having two identical production environments, called blue and green.
vi DemoApp02.yml
apiVersion: apps/v1
kind: Deployment
metadata:
name: deploy2
labels:
app: app-v2
spec:
replicas: 3
selector:
matchLabels:
app: app-v2
template:
metadata:
labels:
app: app-v2
spec:
affinity:
nodeAffinity:
requiredDuringSchedulingIgnoredDuringExecution:
nodeSelectorTerms:
- matchExpressions:
- key: beta.kubernetes.io/arch
operator: In
values:
- amd64
- arm64
containers:
- name: deploy-images
image: kellyamaploy-images:v2
ports:
- containerPort: 8080
vi ServiceApp02.yml
apiVersion: v1
kind: Service
metadata:
name: svc2
labels:
app: app-v2
spec:
ports:
- port: 8080
nodePort: 32600
protocol: TCP
selector:
app: app-v2
type: NodePort
copy the public cluster ip and with the port being expose in the SG(32600) and paste in the browse
flip the service file ( vi ServiceApp01.yml) and change the app-v1 to app-v2 and apply the below
kubectl apply -f ServiceApp01.yml
Afterwhich you will delete second service file and first deployment file ( deploy1 and svc2)