Wednesday, 17 March 2021
Saturday, 6 March 2021
Terraform CD Pipeline Setup to Deploy App Servers
Overview
The goal is to implement Devops best practices to run Terraform in Jenkins Pipelines. We will go over the main concepts that need to be considered and a Jenkinsfile that runs Terraform. The Jenkinsfile will consists of parameters that allows us to pass data as variables in our pipeline job.
- Install Terraform on Jenkins Server
- Install Terraform Plugin on Jenkins
- Configure Terraform
- Store and Encrypt Credentials in Jenkins
- Setting up CD Pipeline with Terraform to Deploy App Servers
- Run Pipeline Job
Install Terraform on Jenkins Server
Use the following commands to install Terraform on Jenkins server and move the binaries to the correct path as shown below.
- wget https://releases.hashicorp.com/terraform/0.12.24/terraform_0.12.24_linux_amd64.zip
- unzip terraform_0.12.24_linux_amd64.zip
- sudo mv terraform /usr/bin/
Install Terraform plugin on Jenkins
Go to Manage Jenkins > Manage Plugins >Available > search Terraform as shown below:

As you can see, Terraform Plugin is already installed on my Jenkins hence why it's displayed in the Installed section.
Store and Encrypt Credentials in Jenkins (Access and Secret Key)
In this step, we will be storing and encrypting the access and secret key in Jenkins to maximize security and minimize the chances of exposing our credentials.
- Go to Manage Jenkins > Manage Credentials > Click on Jenkins the highlighted link as shown below

- Select Add Credentials
- Choose Secret text in the Kind field

- Enter the following below:
Note: Modify the yellow highlighted text with the right value.
- Secret = EnterYourSecretKeyHere
- ID = AWS_SECRET_ACCESS_KEY
- Description = AWS_SECRET_ACCESS_KEY
Click OK
Add another credential and enter the following:
- Secret = EnterYourAccessIDHere
- ID = AWS_ACCESS_KEY_ID
- Description = AWS_ACCESS_KEY_ID
Click OK
Configure Terraform
Go to Manage Jenkins > Global Tool Configuration > It will display Terraform on the list.
- Enter terraform in the Name field
- Provide the path /usr/bin/ as shown below

Setting up CD Pipeline for Terraform
- Go to Jenkins > New Items. Enter terraform-pipeline in name field > Choose Pipeline > Click OK

- Select Configure after creation.
- Go to Build Triggers and enable Trigger builds remotely.
- Enter tf_token as Authentication Token

Bitbucket Changes
- Create a new Bitbucket Repo and call it terraform-pipeline
- Go to Repository Settings after creation and select Webhooks
- Click Add Webhooks
- Enter tf_token as the Title
- Copy and paste the url as shown below
http://JENKINS_URL:8080/job/terraform-pipeline//buildWithParameters?token=tf_token
- Status should be active
- Click on skip certificate verification
- triggers --> repository push
- Go back to Jenkins, select Pipeline Script From SCM
- Enter credentials for Bitbucket, Leave the Branch as blank, Make sure script path is Jenkinsfile
- Right click on Pipeline Syntax and open in a new tab.
- Choose Checkout from Version Control in the Sample Step field

- Enter Bitbucket Repository URL and Credentials, leave the branches blank
- Click GENERATE PIPELINE SCRIPT, copy credentialsId and url (This is required for Jenkinsfile script)

Create Workspace for Terraform Pipeline
Open File Explorer, navigate to Desktop and create a folder cd_pipeline
Once folder has been created, open Visual Code Studio and add folder to workspace

- Open the Terminal
- Navigate to terraform-pipeline repo in Bitbucket
- Run the command before cloning repo: git init
- Clone the repo with SSH or HTTPS

Create a new file main.tf and copy the below code in yellow color

provider "aws" {
region = var.region
version = "~> 2.0"
}
resource "aws_instance" "ec2" {
user_data = base64encode(file("deploy.sh"))
ami = "ami-0782e9ee97725263d" ##Change AMI to meet OS requirement as needed.
root_block_device {
volume_type = "gp2"
volume_size = 200
delete_on_termination = true
encrypted = true
}
tags = {
Name = "u2-${var.environment}-${var.application}"
CreatedBy = var.launched_by
Application = var.application
OS = var.os
Environment = var.environment
}
instance_type = var.instance_type
key_name = "Enter_KEYPAIR_Name_Here"
vpc_security_group_ids = [aws_security_group.ec2_SecurityGroups.id]
}
output "ec2_ip" {
value = [aws_instance.ec2.*.private_ip]
}
output "ec2_ip_public" {
value = [aws_instance.ec2.*.public_ip]
}
output "ec2_name" {
value = [aws_instance.ec2.*.tags.Name]
}
output "ec2_instance_id" {
value = aws_instance.ec2.*.id
}
- Create a new file security.tf and copy the below code in yellow color
resource "aws_security_group" "ec2_SecurityGroups" {
name = "u2-${var.environment}-sg-${var.application}"
description = "EC2 SG"
ingress {
from_port = 22
to_port = 22
protocol = "tcp"
cidr_blocks = ["0.0.0.0/0"]
}
ingress {
from_port = 8081
to_port = 8081
protocol = "tcp"
cidr_blocks = ["0.0.0.0/0"]
}
name = "u2-${var.environment}-sg-${var.application}"
description = "EC2 SG"
ingress {
from_port = 22
to_port = 22
protocol = "tcp"
cidr_blocks = ["0.0.0.0/0"]
}
ingress {
from_port = 8081
to_port = 8081
protocol = "tcp"
cidr_blocks = ["0.0.0.0/0"]
}
ingress {
from_port = 8082
to_port = 8082
protocol = "tcp"
cidr_blocks = ["0.0.0.0/0"]
}
ingress {
from_port = 80
to_port = 80
protocol = "tcp"
cidr_blocks = ["0.0.0.0/0"]
}
#Allow all outbound
egress {
from_port = 0
to_port = 0
protocol = "-1"
cidr_blocks = ["0.0.0.0/0"]
}
}
from_port = 8082
to_port = 8082
protocol = "tcp"
cidr_blocks = ["0.0.0.0/0"]
}
ingress {
from_port = 80
to_port = 80
protocol = "tcp"
cidr_blocks = ["0.0.0.0/0"]
}
#Allow all outbound
egress {
from_port = 0
to_port = 0
protocol = "-1"
cidr_blocks = ["0.0.0.0/0"]
}
}
- Create a new file variable.tf and copy the below code in yellow color.
variable region {
type = string
default = "us-east-2"
}
variable "instance_type" {}
variable "application" {}
variable "environment" {}
############## tags
variable os {
type = string
default = "Ubuntu"
}
variable launched_by {
type = string
default = "USER"
}
############## end tags
- Create a new file deploy.sh and copy the below code in yellow color.
#!/bin/bash
set -x
exec > >(tee /var/log/user-data.log|logger -t user-data -s 2>/dev/console) 2>&1
echo ""
echo "........................................"
echo "Installation of application"
echo "........................................"
echo "Today's date: `date`"
echo "........................................"
echo ""
sudo pip install awscli
sudo apt-get install -y unzip
sudo apt update
sudo apt dist-upgrade
sudo apt autoremove
sudo apt update
sudo apt-get install openjdk-8-jdk openjdk-8-doc
java -version
sudo apt install wget software-properties-common
sudo wget -qO - https://api.bintray.com/orgs/jfrog/keys/gpg/public.key | sudo apt-key add -
sudo add-apt-repository "deb [arch=amd64] https://jfrog.bintray.com/artifactory-debs $(lsb_release -cs) main"
sudo apt update
sudo apt install jfrog-artifactory-oss
sudo systemctl stop artifactory.service
sudo systemctl start artifactory.service
sudo systemctl enable artifactory.service
sudo systemctl status artifactory.service
echo ""
echo "........................................"
echo "Installation of application"
echo "........................................"
echo "Today's date: `date`"
echo "........................................"
echo ""
- Create a new file Jenkinsfile and copy the below code in yellow color.
pipeline {
agent {
node {
label "master"
}
}
parameters {
string(name: 'AppName', defaultValue: 'Enter App Name', description: 'Name of application', )
choice(choices: ['master', 'dev', 'qa', 'prod'], description: 'Select lifecycle to Deploy', name: 'Branch')
choice(choices: ['t2.micro', 't2.small', 't2.medium'], description: 'Select Instance Size', name: 'InstanceSize')
booleanParam(name: 'autoApprove', defaultValue: false, description: 'Automatically run apply after generating plan?')
}
environment {
AWS_ACCESS_KEY_ID = credentials('AWS_ACCESS_KEY_ID')
AWS_SECRET_ACCESS_KEY = credentials('AWS_SECRET_ACCESS_KEY')
TF_VAR_instance_type = "${params.InstanceSize}"
TF_VAR_environment = "${params.Branch}"
TF_VAR_application = "${params.AppName}"
}
//
stages {
stage('checkout') {
steps {
echo "Pulling changes from the branch ${params.Branch}"
git credentialsId: 'paste-credentialsId-here', url: 'paste-url-here' , branch: "${params.Branch}"
}
}
stage('terraform plan') {
steps {
sh "pwd ; terraform init -input=true"
sh "terraform plan -input=true -out tfplan"
sh 'terraform show -no-color tfplan > tfplan.txt'
}
}
stage('terraform apply approval') {
when {
not {
equals expected: true, actual: params.autoApprove
}
}
steps {
script {
def plan = readFile 'tfplan.txt'
input message: "Do you want to apply the plan?",
parameters: [text(name: 'Plan', description: 'Please review the plan', defaultValue: plan)]
}
}
}
stage('terraform apply') {
steps {
sh "terraform apply -input=true tfplan"
}
}
stage('terraform destroy approval') {
steps {
input 'Run terraform destroy?'
}
}
stage('terraform destroy') {
steps {
sh 'terraform destroy -force'
}
}
}
}
- Commit and push code changes to Repo with the following:
- In Vscode, navigate to Source Code Icon on the right tabs on the side
- Enter commit message
- Click the + icon to stage changes

- Push changes by clicking on the 🔄0 ⬇️ 1 ⬆️ as shown below

Run Pipeline Job
- Go to terraform-pipeline on Jenkins and run build
Note: The pipeline job will fail the first time to capture the parameters in Jenkinsfile
- The next time you run a build you should see as shown below

- Enter Artifactory in the AppName field
- Select a Branch/Lifecycle to deploy server
- Choose t2.small or t2.medium for Artifactory server.
- Go to Console Output to track progress
Note: You can abort the destroy step and rerun the step by installing Blue Ocean Plugin on Jenkins to delete the resources created.
Saturday, 20 February 2021
Deploying with Ansible Tower( Playbook to deploy artifact to tomcat)
The below playbook will log into tomcat server Create a folder called Downloads. Download artifact into it and copy them into the /var/lib/tomcat8/webapps
Playbook 4
---
- name: Playbook to Download and Deploy Artifact in tomcat
hosts: "{{ deploy_host }}"
tasks:
- name: Create a Directory /opt/Downloads
become: yes
file:
path: /opt/Downloads
state: directory
mode: 0755
owner: tomcat8
group: tomcat8
- name: Download Artifact from Artifactory
become: yes
get_url:
url: https://urloftheartifac
url_password: Sarav@123
url_username: sarav
dest: /opt/Downloads/MyWebApp.war
mode: 0755
group: tomcat8
owner: tomcat8
- name: Copy File to webapp folder
become: yes
copy:
src: /opt/Downloads/MyWebApp.war
dest: /var/lib/tomcat8/webapps
remote_src: yes
mode: 0755
owner: tomcat8
group: tomcat8
- name: Delete a Directory /opt/Downloads
become: yes
file:
path: /opt/Downloads
state: absent
Datadog - Continuous Monitoring
How to enable Apache Tomcat monitoring in Datadog Agent
Datadog is a monitoring service for cloud-scale applications that brings events and metrics from servers, databases, applications, tools and services to present a unified view of the infrastructure, which help them to work collaboratively on the infrastructure to avoid latency, resolve performance problems, and ensure that development and deployment cycles finish on time.
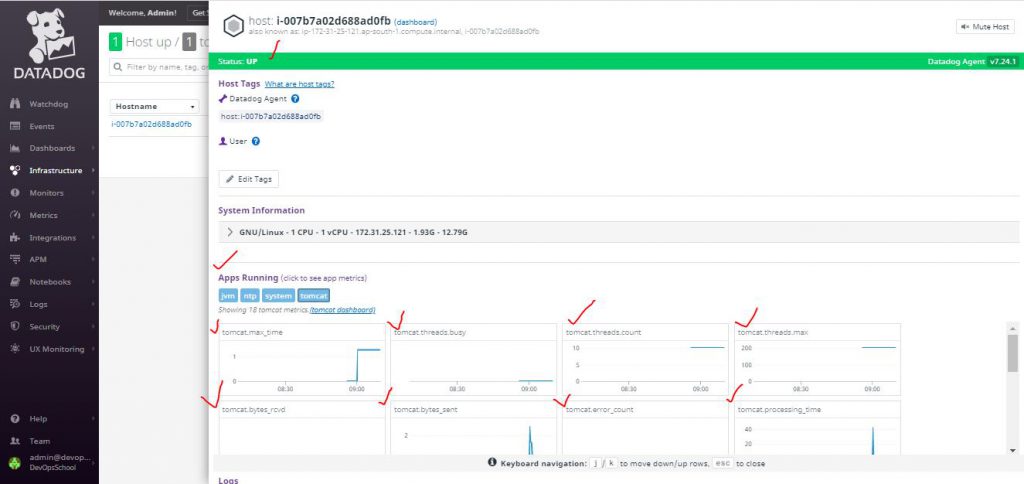
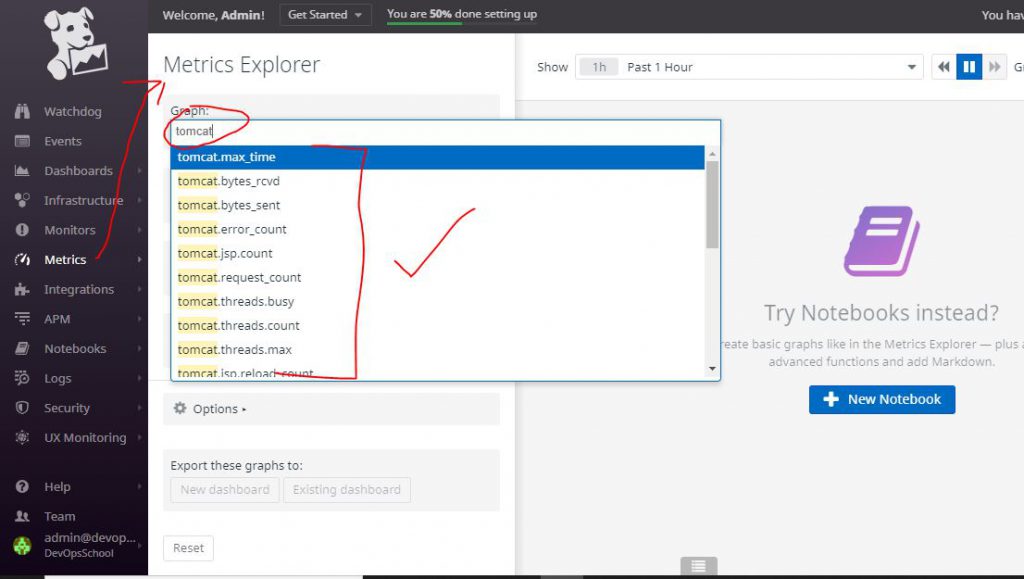
Apache Tomcat Integratoion with Datadog collects Following Tomcat metrics
- Overall activity metrics: error count, request count, processing times, etc.
- Thread pool metrics: thread count, number of threads busy, etc.
- Servlet processing times
Step 1 – Sign up for a Datadog Account
Go to : https://www.datadoghq.com/
Click on Free Trial

Fill the form to sign up
Next: Select your Stack. You can select Tomcat for now

Step 2: Install the datadog Agent on your Tomcat Server

Select your OS:Ubuntu
Then copy the command in the box:Use our easy one step install

Log into your Tomcat server and paste and run the command to install datadog agent
DD_AGENT_MAJOR_VERSION=7 DD_API_KEY=4cf1ee64a11f9c21c2020b85376e552c DD_SITE="datadoghq.com" bash -c "$(curl -L https://s3.amazonaws.com/dd-agent/scripts/install_script.sh)"

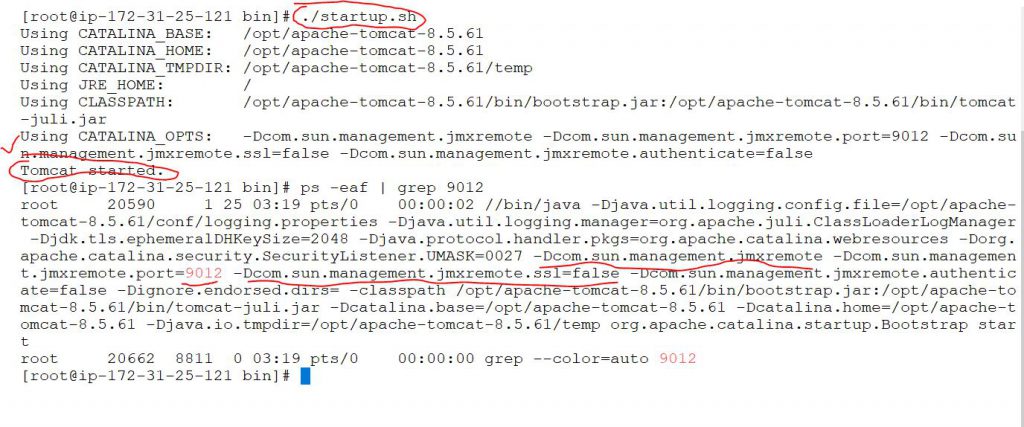
How to enable JMX Remote in Tomcat 8 to Monitor & Administer?
Modify catalina.sh file by adding the below lines$ sudo vi /usr/share/tomcat8/bin/catalina.sh

CATALINA_OPTS="-Dcom.sun.management.jmxremote -Dcom.sun.management.jmxremote.port=9012 -Dcom.sun.management.jmxremote.ssl=false -Dcom.sun.management.jmxremote.authenticate=false"

Save: wq!
Restart the process$ cd /usr/share/tomcat8/bin/
$ ./shutdown.sh
$ ./startup.sh
Reference
- https://tomcat.apache.org/tomcat-8.0-doc/monitoring.html#Enabling_JMX_Remote
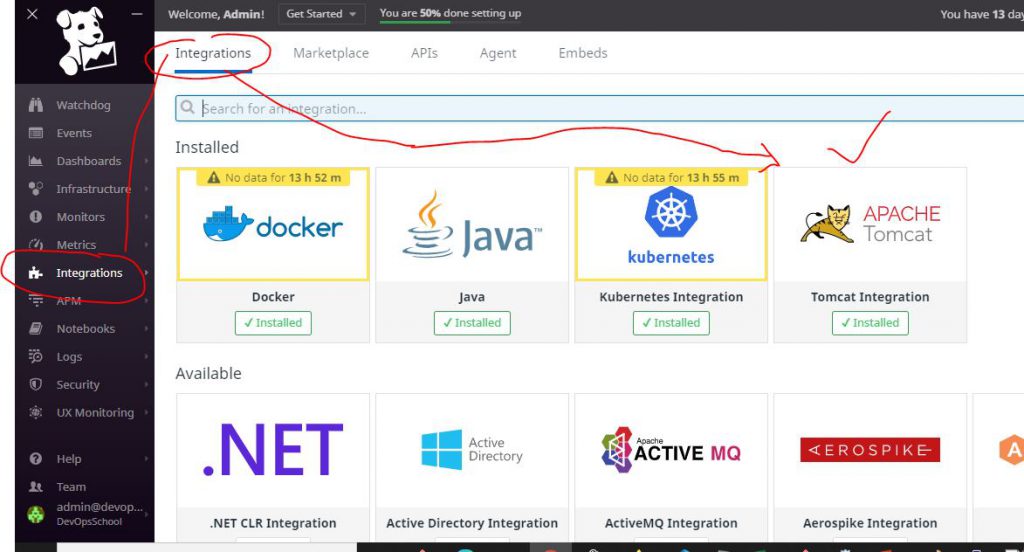
How to configure and enable Tomcat intergration in Datadog agent?
$cd /etc/datadog-agent/conf.d/tomcat.d/
$cp conf.yaml.example conf.yaml
$datadog-agent configcheck
$systemctl restart datadog-agent
$systemctl status datadog-agent
$datadog-agent config


Select your host: And you should see the metric graphs

Subscribe to:
Posts (Atom)