Thursday, 29 October 2020

Automate the creation of EC2 Instance with Terraform

TERRAFORM LAB 2

Please reference link for INSTALLING TERRAFORM ON YOUR LOCAL MACHINE before starting this lab.


Deploying AWS EC2 instances with Terraform is one of the easiest ways to build infrastructure as code, and automate the provisioning, deployment and maintenance of resources to EC2 as well as custom solutions. This lab will walk you through the basics of configuring a single instance using a simple configuration file and the Terraform provider.

Prerequisites:

AWS access and secret keys are required to provision resources on AWS cloud.

  • Open Visual Code Studio then click on File > Preferences > Extensions then search and install Terraform extension


  • Login to AWS console, click on Username on top right corner and go to My Security Credentials


  • Click on Access Keys and Create New Key


Step I: Open File Explorer, navigate to Desktop and create a folder terraform_workspace.


Step II: Once folder has been created, open Visual Code Studio and add folder to workspace


Step III: Create a new file main.tf and copy the below code in yellow color


provider "aws" {

        access_key = "ACCESS KEY"
        secret_key  = "SECRET KEY"
        region         = "us-east-2"

}

resource "aws_instance" "ec2" {

  ami           = "ami-0a91cd140a1fc148a"

  instance_type = "t2.micro"
  vpc_security_group_ids = [aws_security_group.ec2_sg.id]
  tags = {
    Name = "ec2_instance"
  }

}


Add the block below in main.tf to output the Private IP, Public IP and EC2 Name after creation. (Note: This is not required)

output "ec2_ip" {

    value = [aws_instance.ec2.*.private_ip]

}


output "ec2_ip_public" {

    value = [aws_instance.ec2.*.public_ip]

}


output "ec2_name" {

    value = [aws_instance.ec2.*.tags.Name]

}


Step IV: Create a new file security.tf and copy the below code in yellow color

resource "aws_security_group" "ec2_sg" {
name = "ec2-dev-sg"
description = "EC2 SG"

ingress {
from_port = 22
to_port = 22
protocol = "tcp"
cidr_blocks = ["10.0.0.0/8"]
}

  ingress {
from_port = 80
to_port = 80
protocol = "tcp"
cidr_blocks = ["10.0.0.0/8"]
}

#Allow all outbound
egress {
from_port = 0
to_port = 0
protocol = "-1"
cidr_blocks = ["0.0.0.0/0"]
}
tags = {
    Name = "ec2-dev-sg"
  }
}


Step V: Open Terminal in VSCode


Step V: Execute command below

terraform init
the above command will download the necessary plugins for AWS.

terraform plan
the above command will show how many resources will be added.
Plan: 2 to add, 0 to change, 0 to destroy.

Execute the below command
terraform apply
Plan: 2 to add, 0 to change, 0 to destroy.

Do you want to perform these actions?
  Terraform will perform the actions described above.
  Only 'yes' will be accepted to approve.

  Enter a value: yes

Apply complete! Resources: 2 added, 0 changed, 0 destroyed.

Yay! 
We have successfully deployed our first ec2 instance with terraform............................

Now login to AWS console, to verify the new instance is up and running

Friday, 16 October 2020

How to use Jenkinsfile in a Pipeline(Pipeline As Code)/Convert your Scripted Pipeline into Jenkinsfile

 Prerequisite: Please make sure you have completed Exercise on :https://violetstreamstechnology.blogspot.com/2020/09/understanding-pipelines-how-to-create.html


What is a JenkinsFile?

Jenkins pipelines can be defined using a text file called JenkinsFile. You can implement pipeline as code using JenkinsFile, and this can be defined by using a domain specific language (DSL). With JenkinsFile, you can write the steps needed for running a Jenkins pipeline.

The benefits of using JenkinsFile are:

  • You can create pipelines automatically for all branches and execute pull requests with just one JenkinsFile.
  • You can review your code on the pipeline
  • You can audit your Jenkins pipeline
  • This is the singular source for your pipeline and can be modified by multiple users.


This pipeline was defined by the groovy code that was placed in the pipeline section of the Job. 

You would notice something, Anyone that has access to this job can modify the pipeline as they wish. This can cause lots of problems especially when you have large teams. Developers can manipulate their builds to always pass, No accountability and integrity of process, Zero maintainability, and lots more
To remediate all this issues Jenkins gives us the ability to use Jenkinsfile so that the code we store in Jenkins can be placed in a Repo and can be version controlled.

How to convert your existing Jenkins Pipeline to Jenkinsfile

Step 1:
Go to your Project in your computer and open git bash.

Step2: Go into your repo(cd myfirstrepo) then open vscode


step3: Create a New File in Vscode and name it Jenkinsfile(note: this file has no extensions)


step 4 Go to your Existing Jenkins Pipeline and copy the pipeline code and paste into the Jenkinsfile


Your code should look like this:
node {
 stage ('Checkout')  {

     build job: 'CheckOut' 
 }
stage ('Build') {
     build job: 'Build' 
    }
stage ('Code Quality scan') {
      build job: 'Code_Quality' 
        }
        
stage('Archive Artifacts') {
build job: 'Archive_Artifacts'
}
 stage('Publish to Artifactory') {
build job: 'Publish_To_Artifactory'
}
stage ('DEV Approve')
      {
            echo "Taking approval from DEV"
               
            timeout(time: 7, unit: 'DAYS') {
            input message: 'Do you want to deploy?', submitter: 'admin'
            }
     }
stage ('DEV Deploy')
         {
             build job: 'Deploy_To_Container'
          }

stage ('Slack notification') {
     
build job: 'Slack_Notification'
    }
  
}

Step 5: Save and push your changes to your repo( You can do this with Vscode  also, but I will use git bash)


Check for your Jenkinsfile on the repo


Step 6: Go to jenkins and create a new Pipeline Job: Pipeline_From_JenkinsFile
Select Pipeline From SCM

Enter credentials for  Bitbucket, Specify the Branch, Make sure script path is Jenkinsfile


Step 7: Save and Run


Thursday, 15 October 2020

How to use vault In Ansible Tower to Encrypt Credentials and sensitive data


Ansible Vault is a feature of ansible that allows you to keep sensitive data such as passwords or keys in encrypted files, rather than as plaintext in playbooks or roles. These vault files can then be distributed or placed in source control

Remember of previous tutorial on How to create EC2 instance with Ansible : https://violetstreamstechnology.blogspot.com/2020/09/how-to-create-ec2-instance-using.html

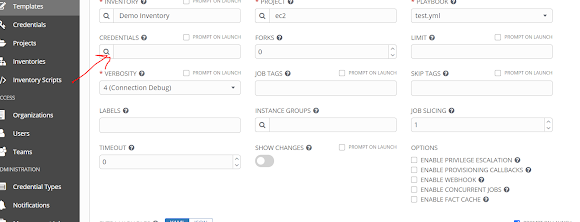
If you notice we had the aws_secret_key and aws_access_key placed as extra variables in Ansible Tower


This is not the best practice. Best practice is to encrypt the access_key and secret_key using Ansible vault to hide this sensitive data.

Lets do this to make our project comply with best practices:

Step 1:

Create a vault credential

Create the “Vault AWX” vault credential.

Left Menu (Credentials) > click [+] > Fill the form > click [SAVE]


Give name as  access_key: Any name will work


VAULT_PASSWORD:Give it any password you desire: For this tutorial you can use:admin123


Step 2: Encrypt the access_key and secret_key strings

step 2.1 :Log into the Ansible Tower machine

step 2.2: Use the below command:

ansible-vault encrypt_string "AKIAXR5FQWYQMB" --name "access_key"

Replace Highlighted green above with your access_key


You will be prompted for password. use admin123

You should get result like below:


Copy the encrypted output and save in a notepad(see eg below, copy text in green)

access_key: !vault |
          $ANSIBLE_VAULT;1.1;AES256
          32666533393238663538663035343932386637386562383830363963643163356537646161316565
          6631303132633362663138313334653531306230333866310a373866356135623732613765643234
          31643430313236306664376633356564343639376637323832323832313036346231353964336236
          6435313139666530380a316331633837376263613637623630633033343734333839326234396131
          30303933623736393735393762353863333262313431663130643235636663663236

If you get an error like

Error reading config file (/etc/ansible/ansible.cfg): File contains no section headers.

file: <???>, line:  9 

u'collections_paths = /home/ubuntu/.ansible/collections/ansible_collections\n'

open /etc/ansible/ansible.cfg  with vi editor and insert 
collections_paths = /home/ubuntu/.ansible/collections/ansible_collections  below [Default] header

$ sudo vi /etc/ansible/ansible.cfg


Then try again


Step 3: Repeat the same process for secret_key: we will use same password:admin123

Step 4: Go to your Playbook from previous exercise, Extra Variables And Paste the encrypted variable

---
- hosts: "{{ host }}"
gather_facts: true
vars:
access_key: YOUR_ACCESSKEY
secret_key: YOUR_SECRETKEY
tasks:
- name: Provision instance
ec2:
aws_access_key: "{{ access_key}}"
aws_secret_key: "{{ secret_key }}"
key_name: "{{ pem_key }}"
instance_type: t2.micro
image: ami-03657b56516ab7912
wait: yes
count: 1
region: us-east-2


Replace your accesskeys and secret keys variables with the encrypted string u copied from vault
New playbook should look like below:

---
- hosts: "{{ host }}"
gather_facts: true
vars:
access_key: !vault |
$ANSIBLE_VAULT;1.1;AES256
34376266633337386531356334323464633063633238356564623535653733346531663638393833
3439633230316565363365326436313063363865396565640a306136623863383365613231396166
64303062633561306338346364633132656435396166623361666534353730616365383134663532
3934363563613764310a313661643034666530663235316438336266663833323933343562306337
64343738633030346537386363653464616166343832616561336231313763616266
secret_key: !vault |
$ANSIBLE_VAULT;1.1;AES256
37333631633938653231633238353434373063663865666434343266383636346336343936643336
6338316330316461336365373165313163363432333630360a343334316665643336333762363665
62383035383534386238376363373339666531613262376239393466653234376330326138633239
6361646661323037640a306530663331616339343062333164366666343263383332333962643936
31316338653139633837303563396463313461343232396166346664376230316565376330356166
3436366138363430653838313064653563653731626539306664
tasks:
- name: Provision instance
ec2:
aws_access_key: "{{ access_key}}"
aws_secret_key: "{{ secret_key }}"
key_name: "{{ pem_key }}"
instance_type: t2.micro
image: ami-03657b56516ab7912
wait: yes
count: 1
region: us-east-2

Step 5: In Templates go to credentials Section
Select your Vault credentials for access_key


Save and run your template. The playbook will use the new encrypted variable


Monday, 12 October 2020

Create Microservices and Multiple containers with Docker- Compose(Deploy Wordpress with Docker-Compose)

 Think of docker-compose as an automated multi-container workflow. Compose is an excellent tool for development, testing, CI workflows, and staging environments. According to the Docker documentation, the most popular features of Docker Compose are:

  • Multiple isolated environments on a single host
  • Preserve volume data when containers are created
  • Only recreate containers that have changed
  • Variables and moving a composition between environments
  • Orchestrate multiple containers that work together

Docker Compose file structure

Now that we know how to download Docker Compose, we need to understand how Compose files work. It’s actually simpler than it seems. In short, Docker Compose files work by applying mutiple commands that are declared within a single docker-compose.yml configuration file. The basic structure of a Docker Compose YAML file looks like this:

Now, let’s look at real-world example of a Docker Compose file and break it down step-by-step to understand all of this better. Note that all the clauses and keywords in this example are commonly used keywords and industry standard. With just these, you can start a development workflow. There are some more advanced keywords that you can use in production, but for now, let’s just get started with the necessary clauses.

  • version ‘3’: This denotes that we are using version 3 of Docker Compose, and Docker will provide the appropriate features. At the time of writing this article, version 3.7 is latest version of Compose.

  • services: This section defines all the different containers we will create. In our example, we have two services, web and database.

  • web: This is the name of our Flask app service. Docker Compose will create containers with the name we provide.

  • build: This specifies the location of our Dockerfile, and . represents the directory where the docker-compose.yml file is located.

  • ports: This is used to map the container’s ports to the host machine.

  • volumes: This is just like the -v option for mounting disks in Docker. In this example, we attach our code files directory to the containers’ ./code directory. This way, we won’t have to rebuild the images if changes are made.

  • links: This will link one service to another. For the bridge network, we must specify which container should be accessible to which container using links.

  • image: If we don’t have a Dockerfile and want to run a service using a pre-built image, we specify the image location using the image clause. Compose will fork a container from that image.

  • environment: The clause allows us to set up an environment variable in the container. This is the same as the -e argument in Docker when running a container.

Lab Exercise: Create Docker Containers running WordPress; a MySQL database and an Apache PHP web server.
Prerequisite: Docker installed, Docker-compose installed
Step 1: Create yml file
Make a directory  called wordpress
$ mkdir wordpress
Go into the directory
$ cd wordpress
Using vi Editor to create docker-compose file:
$ vi docker-compose.yml

Copy and paste the below code in the editor
version: '3.3'

services:
wordpress:
depends_on:
- db
image: wordpress:latest
volumes:
- wordpress_files:/var/www/html
ports:
- "80:80"
restart: always
environment:
WORDPRESS_DB_HOST: db:3306
WORDPRESS_DB_USER: wordpress
WORDPRESS_DB_PASSWORD: my_wordpress_db_password

db:
image: mysql:5.7
volumes:
- db_data:/var/lib/mysql
restart: always
environment:
MYSQL_ROOT_PASSWORD: my_db_root_password
MYSQL_DATABASE: wordpress
MYSQL_USER: wordpress
MYSQL_PASSWORD: my_wordpress_db_password
volumes:
wordpress_files:
db_data:


Save the File
Step 2: Run Docker-compose
 $ docker-compose up -d

This will run docker-compose  and fetch the images from the docker hub and create your WordPress instance. You’ll be able to access WordPress from a browser on port 
80
Go to your browser: your_ip:80